Elements of Exposure: Aperture
Do you love a blurry background? Today I’m excited to talk about Aperture because THIS element is the key to unlocking that look in your photos!

I live on f/2.8. As a portrait photographer, a shallow depth of field is a core component of my shooting style because I love the way it isolates attention on my subject.
One day I was out on a shoot and I realized the wheel on the back of my DSLR wasn’t working. I was annoyed I couldn’t easily playback individual photos to show my client on the back of the camera, but otherwise I didn’t think it was worth interrupting the shoot to go back to the studio for another camera body.
Towards the very end of my shoot, my assistant asked “Doesn’t that wheel change something important for your settings?” Oh. Yes it does. It changes my aperture...oops. I lucked out that day and didn’t run into a scenario where I needed a higher f/# for my aperture settings (and that camera body made a prompt visit to the Canon doctor after the shoot), but it’s important to understand how this element of exposure works so that you CAN intentionally choose what aperture you want to use.
So, What is Aperture??
Aperture: The size of the hole that lets light through into your camera. The widest possible f/stop you’ll have available to you is specific to whatever lens you are using. When the hole is widest open it will let in the most light; if the hole is smaller it will let in less light. Imagine it like a hose - more water comes through a wide fire hose than it does your skinny garden hose!
This setting not only affects the amount of light that comes in, but it also determines your Depth of Field (the blurriness of your background (or foreground)). A wide open aperture gives you the most “blurriness” or the most shallow depth of field, and a small, closed down aperture gives you a background that is more in focus. An easy way to remember which size hole correlates to more/less depth of field, is to know that your eyes behave the same way. If you squint your eyes (essentially making your pupil smaller), more things become in focus to you, which is why you instinctively squint when you have trouble seeing something. Conversely, at night when your pupils are wide, you have less depth perception.
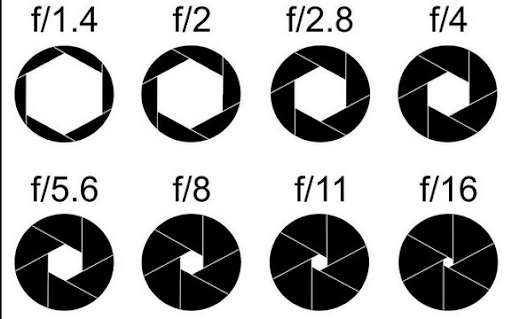
The unit of measure for your aperture setting is called an “F stop” or “F number” and is written as a fraction (f/# or f/stop), as it is mathematically a fraction. This matters, because the tricky part about this setting is that smaller numbers equate to the larger holes, and larger numbers equate to smaller holes (because fractions, but don’t worry too much about trying to remember fifth grade math if you don’t want to, just believe us).
Let’s take a look at an example! For these images, I was focusing on the largest orchid in this floral arrangement. The image on the left was shot at f/2.8, the widest aperture for that lens. You can see that the pillow is completely blurry, and even parts of the arrangement are out-of-focus. The image on the right was shot at f/22, the smallest aperture for that lens and you can see the detail in the pillow and even couch in the background is in focus.

Like I mentioned earlier, for the majority of my portraiture, I use wide apertures because I love the look of a shallow depth of field where my subject really stands out from the background as the focus of the image. The catch 22 is that shooting at lower F Stop can be trickier to focus, and if you’re photographing a group of people that has any depth to it (i.e. people are not standing EXACTLY in a straight line perpendicular to your camera) or any objects at varying distances from your camera that you want to all be in focus- you’ll need a higher F Stop.
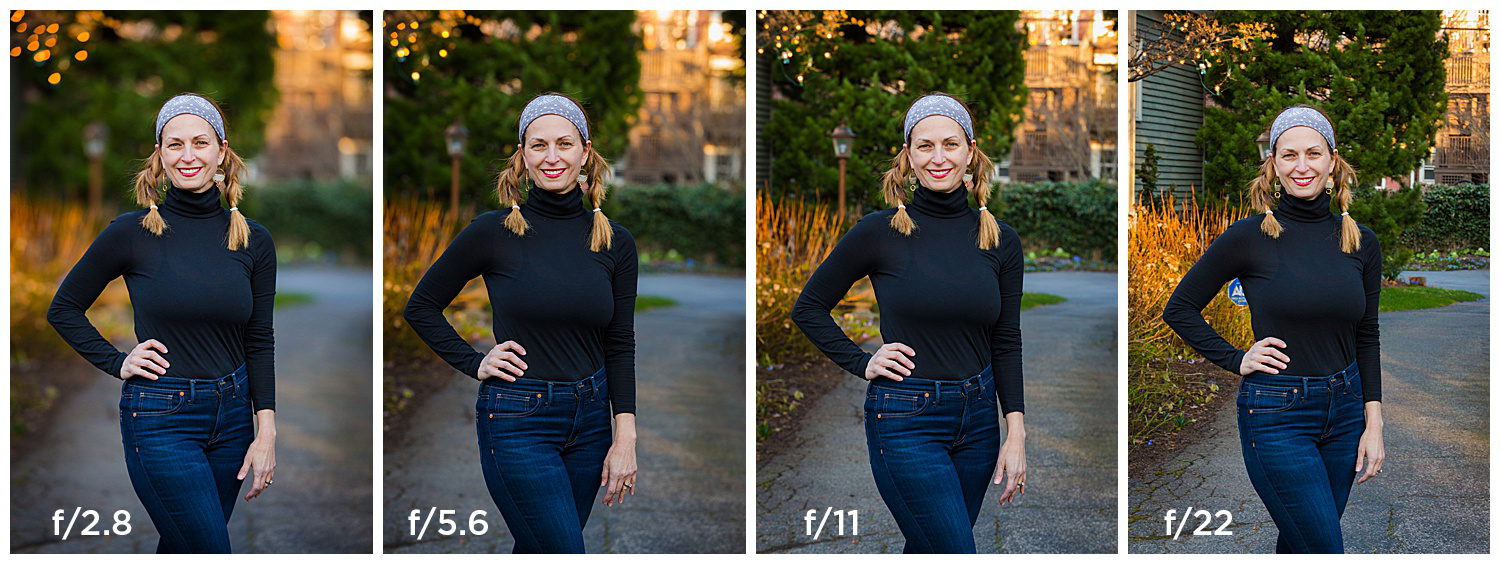
Here’s an example in a portrait setting: you can really see at f/2.8 how much my subject feels is the focus, and the background has almost looks like an impressionistic painting. However, if the architecture or other background details were important to you, you would want them to be sharp and use a smaller aperture like f/22 (or somewhere in between those extremes.) One is not inherently better than the other - it’s simply a matter of preference (and available light). If you want to shoot at f/22, keep in mind it’s letting a very small amount of light through, so if you’re already in a limited light situation (a dark room, late in the evening, etc.) - you might not be able to shoot at such a high f/number.
If you’ve been stuck in auto mode and don’t want to deal with the complexity of manual mode, BUT you still want control over your aperture to achieve a certain affect, then Aperture Priority Mode is going to be your new best friend. If you want to learn more about this and other shooting modes, then click here to check out our post AUTO Alternatives: Shooting Modes for Exposure!
So that’s it!! I hope with this knowledge in hand you have the confidence to go after your bokeh and blurry background bucket list!! If you’re not already following my NSP Academy Newsletter, head over to NSP Photo Academy. You’ll get alerted when my newest posts drop AND you can instantly access my exclusive guide, 6 Ways to Start Taking Better Photos Today!!! Give me a tag at #NSPphotoacademy so I can see the magic you make!